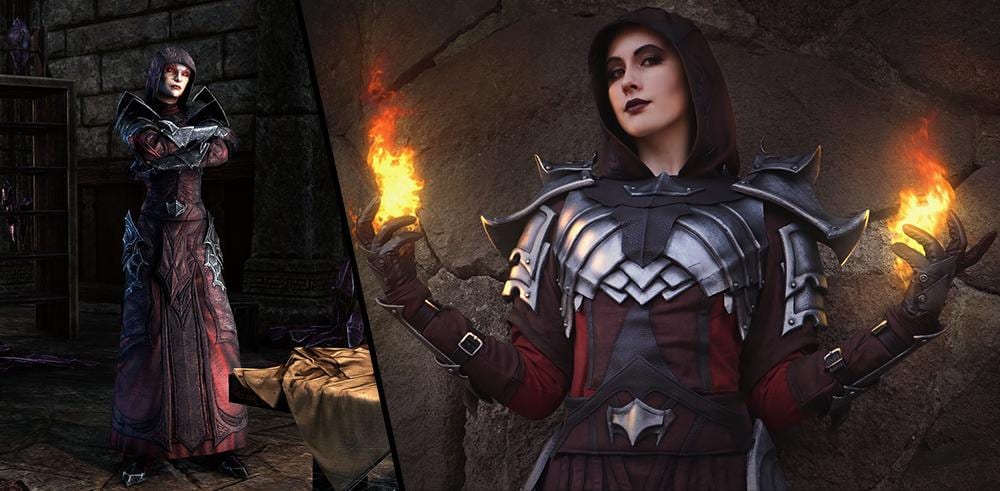
Learn how you can become Lyranth Foolkiller and create your own incredible costume of the mysterious Dremora.
Working in partnership with Bethesda’s Nordic, Trine has crafted an astonishing cosplay of the Gates of Oblivion’s own Lyranth Foolkiller. The result of this team-up was so incredible, we asked Trine to share their creative process and tips, so you can become the enigmatic Daedric ally yourself!
Planning
Whenever starting a new cosplay, I use an app called “Cosplanner” and split up the cosplay in parts such as hood, breastplate, shoulder armor, belt, etc.
The type of reference material I like to collect is usually screenshots from the game (or movie/series) I am going to cosplay from. If I can rotate the character or camera in game to get just the right angles on the outfit, I am golden. If I can get my hands on it, I also like to use photos and drawings from artbooks, or 3D models I find on the internet. A 3D model is the best reference material in my eyes!
You always want to calculate how much foam and fabric is needed for each part before buying all the materials and try to craft each part in an order that makes it easier to make the next one. For example, make the dress before the hip armor to ensure that the armor won’t look too big or small in comparison.
Materials
For the dress, use brown and red linen and some brown faux leather for details. For the armor, use both Worbla and 2mm and 5mm foam. You want to use Worbla for the pieces you want to be more sturdy or thin, such as the glove armor and bracers.
Everything should be painted with silver and black acrylic paints, and to weather the cosplay you should use an airbrush and some brown/black airbrush paints.
Process
First, sew what I call the “underdress” by using a pattern for a similar dress. It will need a few alterations, so review all the details on Lyranth’s dress. The details on the lower part of the dress are not sewed to the underdress but to the belt because we want to be able to move the belt without risking it not lining up with the details on the skirt.
Once the “base” of the dress is done, you can start making the armor. Craft the bracers and gloves first as a warmup and then move onto the breastplate, followed by shoulder and hip armor. Once all the armor parts are made, prime and paint everything. You want to do it this way to make sure every armor part is painted the same way and looks cohesive.
The last part you need to make is the hood, which you should glue to the breastplate to make sure it always sits correctly. Finish the cosplay by airbrushing the entire costume so it looks dirty and used and has the same look all around.
Tips, Tricks, & Advice
When crafting this costume, you might have quite a hard time making all the thin fabric details on the edges of the skirt. Cut out and wrap fabric around 2mm foam to get the right shape and make it look a little more 3D. It’ll take some time and is a challenge, but it’s well worth it.
Use velcro to open the breastplate in the side, underneath one of the arms. It is super easy to do in a way that won’t be visible, and it makes the breastplate easy to open and put on. Also, gluing the hood to the breastplate worked great and made sure it would always sit perfectly.
New Cosplayer Advice
If you’re new, watch some YouTube videos, look up a few tutorials, and then just start doing it! Just. Start! A lot of people overthink and overanalyze starting a cosplay, and often it leads to them feeling too intimidated to even begin or try. I personally believe in learning by doing and by trial and error, and it is also so much fun to learn that way!
A big thank you to Trine for working with us to create this amazing costume and taking the time to share their process for its creation with the #ESOFam. You can find more photos and cosplays from Trine on her Instagram and Facebook pages—check them out!